I’ll use the same image to write about two different things: it’s a Two-fer Teaching Point!
First up, graduated filters. With virtual graduated filters now built into Lightroom and almost every other post processing product that people use these days, I often get asked whether or not it’s still useful to bring them into the field.
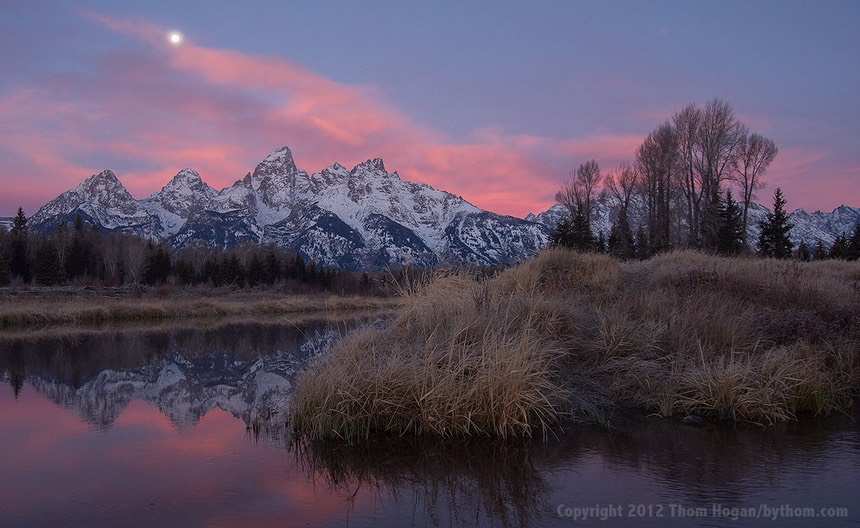
Yes, absolutely. This image is a good example of why. That’s the moon up there in the sky, and in this pre-dawn exposure the foreground is massively lower in light than the sun reflecting off the moon. I didn’t use a graduated neutral density filter on this image, and the moon therefore is a complete blow out. No amount of Highlight recover is going to give it any detail back.
Of course, even a three-stop graduated ND filter might not have saved it in this case. A two-step would (and did) save it several minutes later as the light rose a bit in the foreground. But I like the gentle feel of the pre-dawn light in this image better, so I’m kicking myself about not doing something about that moon. I could have brought the sky exposure down three stops with a filter.
So, yes, I still recommend that landscape photographers carry graduated ND filters with them. (My preferred filter most of the time is a two-stop soft, but Singh-Ray also makes hard edge plus one and three stop versions, and often carry a mix in the field). I also tend to recommend you carry a circular polarizer with you for dealing with unwanted reflections, too. But that’s about it in terms of filters I use regularly in the field any more. Everything else can be done as well in post these days, often better.
Okay, I promised two teaching points.
You’ll note that this is another 16:9 aspect ratio image (well, close, I cropped a bit). These days I’m often composing in this aspect ratio, and as I’ve noted that might be because of my filmmaking background: I like wide screens and I will not lie…
What did the full frame look like?
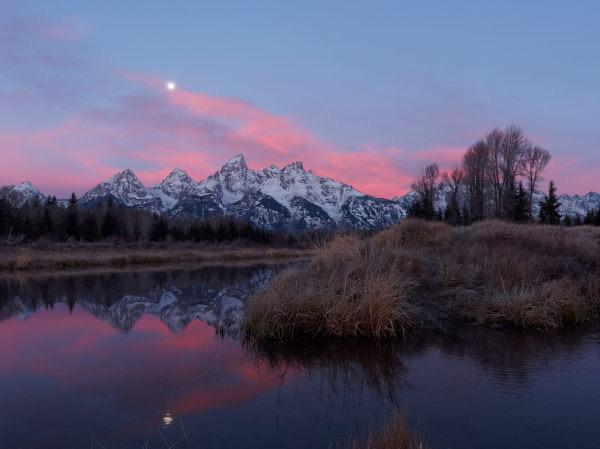
You’ll note a couple of things. Even here I was trying to keep to near 16:9 (bottom of the full image; the top sky is superfluous and doesn’t add anything). The reason for this was simple: I had the reflection of the Tetons, shouldn’t I also have the reflection of the sky and moon?
Unfortunately, this led to a lot of not-so-great bits being added to the framing:
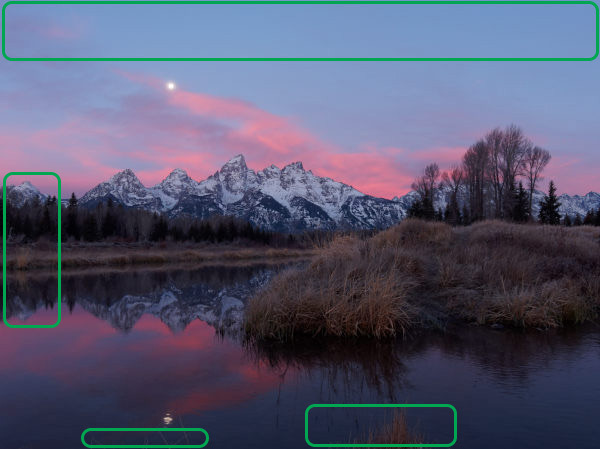
I’ve got that “nothing sky” at the top. On the bottom, I’ve got near bank weeds sticking up into the reflections, but not the bank itself (I do have the near bank in another image, which I like less). And note the mountains: the core of the Tetons are the four peaks in the middle. The echo at the left is a bit weak, and it really doesn’t hold the eye at the border. Which is why I cropped thusly:
A strong, below middle-of-frame horizontal base, with a clear diagonal leading you up into the sky above the main peaks. Enough reflection to tell you how tranquil it was, but not a slavish complete echo reflection. The action is at the top of the frame: trees, peaks, lit sky, moon. The composition is built to emphasize that.
I’ve got better images from this session, but I wanted to show this one because it’s a work in progress and better indicates where I was starting from and the teaching points I was trying to put into practice. I started with no graduated filter, which was a mistake. I started by being too slavish to the reflections and not seeing that strong diagonal drive.
The real trick in the field is to keep working. Keep asking yourself what’s sub-optimal, what’s not working. Some of it will be technical, as in the moon exposure here. Some of it will be emotional, as in the composition.
In a situation like this I probably had less than ten minutes of decent color. Thus, you need to be relatively disciplined at working the scene. First, I’ve been to this location many times before, so I knew what I was dealing with in terms of subject and where I wanted to be. Indeed, I had been there the day before, so I knew the current state of vegetation and water and snow, and from the weather forecast had a reasonably good idea that I should be there the next morning. So get all those things out of the way before the magic light time comes.
Then as the light gets close to where you want it, make sure you work through the technical things quickly. Aperture, focus point (and thus DOF from those two things), exposure, filtration if needed, leveling of the tripod (or not), ISO and white balance settings, etc. Have a checklist, real or mental, so that you work through them all.
Finally, take the photo (a previous teaching point). But don’t stop working. Now you’re trying to work compositionally and emotionally while the light is at its best. Which areas you’ve framed support what you’re doing, which don’t?
One of the mistakes I find amateurs making is that they get tripod locked. They set up their tripod in that spot, the light is right, so they spend all their time while the light is best discovering that they didn’t set something, set something wrong, or worse, just take multiple images of the same exact thing, perhaps varying one thing, such as exposure. One of the things I learned from Galen Rowell was this: once you’ve got this image, move on. Find another photo. It might be better. That’s exactly what I did this morning, and exactly what ended up happening.
Still: work the technical before you need it (e.g. DOF, filtration, etc.), then work the emotional as it happens (e.g. magic light). Only after you’ve accomplished that is it time to move on. But if you can get as much of the technical done before the light is optimum, you can spend all your time on the emotional when the light is optimal. And again, once you’ve got the image, move on and bag another.