It always amazes me that people will argue at length over which camera’s JPEG is better, but they then use examples from Web sites that always test with default settings. Even if they use their own images to evaluate, I still find the default settings in place ;~).
Yes, the camera makers all pick default settings for you when you set JPEG. Those tend to have a contrast boost, a slight saturation boost, and sometimes more changes from "neutral" data. Many of the defaults also have “automatic” adjustments in them that will make results tough to repeat. I will also say this: it's rare that a camera maker’s defaults creates an image exactly as I want it to be.
It’s probably a book-length topic in its own right, but today I want to call attention to the basics you need to understand and master if you want great-looking JPEGs out of the camera.
The short list:
- You must “nail” the exposure. You don’t have room for error here, as the data will be encoded into only 8 bits and then compressed (i.e. data thrown away). Errors in exposure are tough to fix downstream with JPEGs, and trying to move tonal ramps after the fact often results in banding when you do.
- You should “dial in” the color. Yes, I know the cameras all have an automatic white balance capability. Outside of noon outdoors on a sunny day, “automatic" tends to drift off the proper colors. As with exposure, having only 8 bits means if you have to adjust white balance downstream, you’ll be limited in what you can do later.
- You need to “season" to taste. Saturation, contrast, sharpness, and noise reduction, for example, are not things where there is a right or wrong answer. Your taste will be different than mine. I will say this: particularly with these types of settings it’s far easier to adjust (fix) a neutral value in post processing than one that is already cooked into the pixels, particularly extreme choices for multiple settings.
Note one persistent thought in each numbered item: post processing gets more difficult or problematic if you don’t manage these three things correctly.
Already we have two big things to discuss.
First, what’s the order in which you perform these three items? Would you believe the opposite of the numbering I just used? #2 and #3 impact #1, so I’d tend to have #3 always set the way I want for a scene first, then measure white balance and set that, and only after those are done attempt getting the exposure set. If you do it in the above numbered order, what happens is that you iterate a lot: set exposure, set color balance, adjust exposure, set seasonings, adjust exposure.
So, for me, when I take JPEG images I first make sure my camera is already set for the seasonings I need for the type of photo I’m taking (probably from a settings file I saved). I then walk into the scene, do a quick white balance (typically PRESET measured off a gray card), and finally dial in my exposure as I start to compose and begin to take photos. You can do it a different way if you’d like, but it might not be as concise and fast as my method.
Note that “light” (and thus #1 and #2) doesn’t tend to change in a scene unless something is changing it. That’s why my friend Chas Glatzer says “shoot the light.” Unless something changes the lighting, setting white balance and exposure is something you only do once. If the lighting does change, well, revisit those two settings.
Okay, that’s the broad picture, so now let’s drop down into those seasonings for our second discussion.
No camera that I know of takes “neutral” JPEG images when set to its defaults. None. The camera makers are all juicing color, contrast, saturation, sharpening, and other attributes to something they think you’ll find pleasing. Perhaps they got that right, but I’ll bet that I can create better looking JPEG images from your camera by changing settings than you can by using the defaults.
Before we get to that, we have to distinguish between two types of images: (1) straight out of camera results; versus (2) best JPEG data for post processing. These are not the same. If you have a need for a finished JPEG image right out of the camera—no post processing will be performed—then you absolutely must get all three points above correct. On the other hand, if you know you’re going to be post processing that JPEG, you need to be careful about not baking too much seasoning into the pixels, because a ton of interacting settings will just make it near impossible to get those impacts back out of the pixels if you need to.
So let’s start with #2 (collect best JPEG data). I’ll use Nikon settings here as those are the ones I’m most familiar with, but every camera has their own variants of these:
- Neutral Picture Control — Why? Because it doesn’t shift colors, it tries to put them in proper relation to one another. No Hue twists or other color shifting constructs are applied. Red is red, blue is blue, green is green.
- Default or no Sharpening (range -3 to +9 or -5 to +5) — Nikon uses a very low value for sharpening in their defaults (+2 sharpening, +1 mid-range, and +0.5 clarity). I’m okay with using Nikon’s defaults as they’re mild and don’t produce halos, but my preference for a “clean” JPEG data set would be 0, 0, and 0.
- Contrast (range -3 to +3) — In a high contrast scene I might add a minimal minus setting (e.g. -1), and in a low contrast scene I might add a minimal plus setting (e.g. +1), but generally I just leave this at 0. Why dial in a slight change in extreme contrasts? I’m trying to make sure that the full width of the data set is used, basically. We only have 8 bits, I don’t want to waste any or overuse that.
- Brightness (range -5 to +5) — Nope, not changing that.
- Saturation (range -5 to +5) — Also not changing that.
- Hue (range -3 to +3) — Definitely not changing this, as it shifts colors.
What I get from JPEGs set this way is accurate color—again, assuming white balance was set properly—with nothing added or subtracted from the pixel values that would be difficult to later remove. Images with the best possible JPEG data are easier to post process and add things to than JPEG images with lots of settings already baked into the pixels.
But most of you want the other choice (#1): a great out-of-camera image.
Thing is, I can’t give you a formula for that because, as I noted, this would be seasoned to your taste, not mine. (And that’s another reason why you want to get away from the defaults, because those also aren’t seasoned to your taste.)
I do have some advice, though (again, I’ll use Nikon Picture Controls in my descriptions):
- Avoid anything automatic. First of all, many of the so-called automatic parameters aren’t 100% repeatable. You get what the camera thinks you should get based upon its evaluation. Even small changes in lighting or contrast or subject movement (overlap) might shift what the camera does. You want to be in full control, not having something making decisions for you.
- Be careful to not go too extreme. The more you bake into your JPEGs, the less likely you can make reasonable changes after the fact with post processing. Moreover, what looks okay on a 3” LCD might not look so great when you see it in full size.
- Contrast and Saturation are the most common things to adjust. Most people gravitate to a contrastier, more saturated image, but it’s easy to overdo this, so sneak up on the right settings and test them by showing images to friends and family.
- Sharpening and noise reduction are “make it look even better” settings. They come last. You have to figure out the first three things before you can set these.
Ah, I used the “test” word in the bullets. Yep, that’s exactly what I want you to do.
Nikon has helpfully labeled their basic Picture Controls Standard, Neutral, Portrait, Landscape, and Vivid (they also have Auto; Auto is Standard that might decide not to be Standard ;~). So, a Nikon shooter can use those as their test bed: set up a landscape, portrait, and other typical scene to shoot, and run through the Picture Controls. (It helps if you know what Nikon is adjusting in each one; for instance, Portrait tends to use lower sharpening than Landscape.) Find the Picture Control you think works best for each of the types of scenes you photograph. For me, that’s boiled down to three: Portrait for a truly person-focused scene, Landscape for a true landscape scene (Vivid is too much), and Neutral or Standard for everything else.
Then refine your settings for each of those typical scenes. For example, I rarely change the Portrait parameters, though I might add a little Saturation if my subjects are wearing colorful outfits. For landscapes, I ended up with slightly different Sharpening, Mid-range Sharpening, and Clarity settings than Nikon defaults to for the Landscape Picture Control. For Neutral, I add Sharpening, but back out the Clarity. Your decisions will be different.
What about Hue, you ask? Well, on a Nikon camera, if you want to fiddle with the position of colors, I’d tend to use the AB/GM tuning control in white balance (Hue changes all colors equally, in the direction on the color wheel you tell it to move them).
At this point you’re probably saying, “wait a second, Thom, you photograph using raw, right?” Yes, I do. Virtually all the time. However, I sometimes use raw+JPEG because I need to push images to a client via SnapBridge or my KludgeBridge quickly, and they want finished JPEGs. And I want those JPEGs to look as good as possible, thus I indeed do (did) all the things that I just described.
_______________________
Okay, you don’t want words, you want pictures.
I’m not going to try to go through all the permutations and combinations, as there are too many. But let’s look at just two of the things I discussed.
First, white balance.
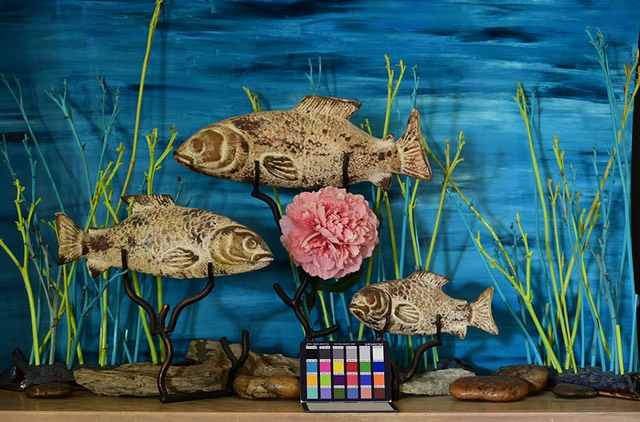
This is what the camera chose. It is slightly on the magenta side. The white patch should be equal R, G, and B values, but B dominates over R which dominates over G.

This is a Preset white balance from a white card (be careful some white sheets have brighteners that’ll push white balance towards blue). The neutral patches are now more evenly matched. R and B values should be equal or within a single digit, as it is the R and B values that shift white balance around the G value. Now, you might not have noticed any difference, but look at the red patch: it’s now true red.
Whoa, what happened? The light changed. I simply turned on an incandescent lamp in the room. Note how all the values went warm. This is Chas Glatzer means by "shoot the light": as long as the light didn’t change, my white balance (and exposure) didn’t change. But the minute the light changed, I need to work through the steps again.
Okay, that’s one of the changes we can make to get good looking JPEGs. How about another? This time let’s look at Picture Controls (that’s what Nikon calls them; other camera companies call them styles, film emulations, and other names, but they’re all basically the same thing: adjustments to underlying values in the post processing).

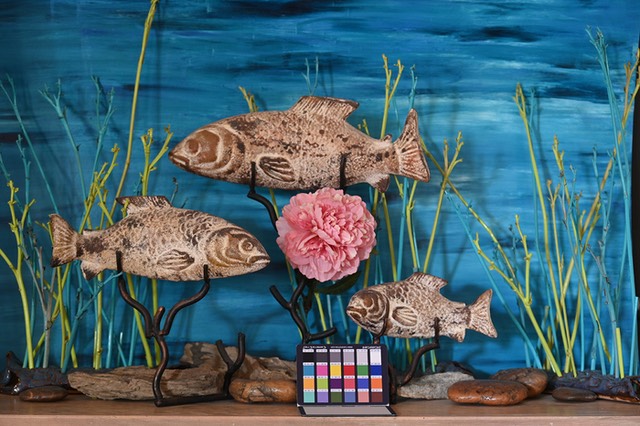
We’ll start with Nikon’s Neutral Picture Control, which is indeed very neutral. The flower is indeed a faded pink, the background a gentle cyanish blue.
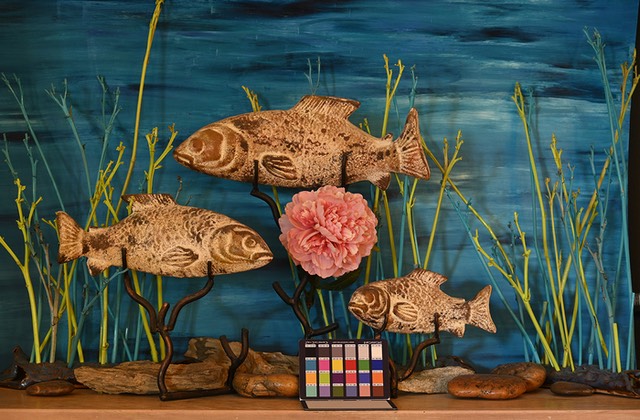
Just changing to Nikon’s Standard Picture Control does a bunch of things. Note that colors are changing and getting more “in your face.” Contrast is higher. You might notice that the rocks towards the bottom are getting darker and closer to black.
I’m not going to step through all the Picture Controls here, but it’s important to understand what each does and whether the things it does are things you want in your image. For a portrait, for example, you probably don’t want the increased contrast that Standard applies, Neutral or Portrait would be better choices. For a landscape, you probably do want these changes, so Standard, Landscape, or possibly Vivid is the right choice.
But remember, we’re now into the seasonings. You’re in charge of the spices that are going to be used in your final JPEG. Bam!
_________________
This question came up after I first posted this article: should I use Active D-Lighting? (Other cameras have different names for this function, such as DRO; Active D-Lighting is a Nikon term.) The answer is maybe. First, there are two things that would indicate you should skip Active D-Lighting: (1) you're recording NEF+JPEG; and (2) your scene is lower in contrast than the dynamic range of the camera.
#1 is a problem because Active D-Lighting (ADL) uses underexposure to preserve highlight data. Your raw image will be underexposed, by as much as 1.3 stops. You don't want that. Settle for the correct NEF exposure and a JPEG with blocked up shadows. Because by the time ADL raises the deep shadows, you may be using a four stop correction. If you have the raw data, you'd rather keep your shadow boost lower than that.
If the scene doesn't exceed the range your camera is capable of (#2), you don't need ADL. You might want to move shadow information upwards and highlight information downwards, but you have more control over that in post processing than you do with ADL. With ADL in JPEGs, it's one and done, and it may not be done the way you want.
That said, when taking JPEGs only, I sometimes set my Nikon's bracketing function to ADL bracketing (2 images, Off and High). In a high contrast scene I just flip bracketing to On and take two images.